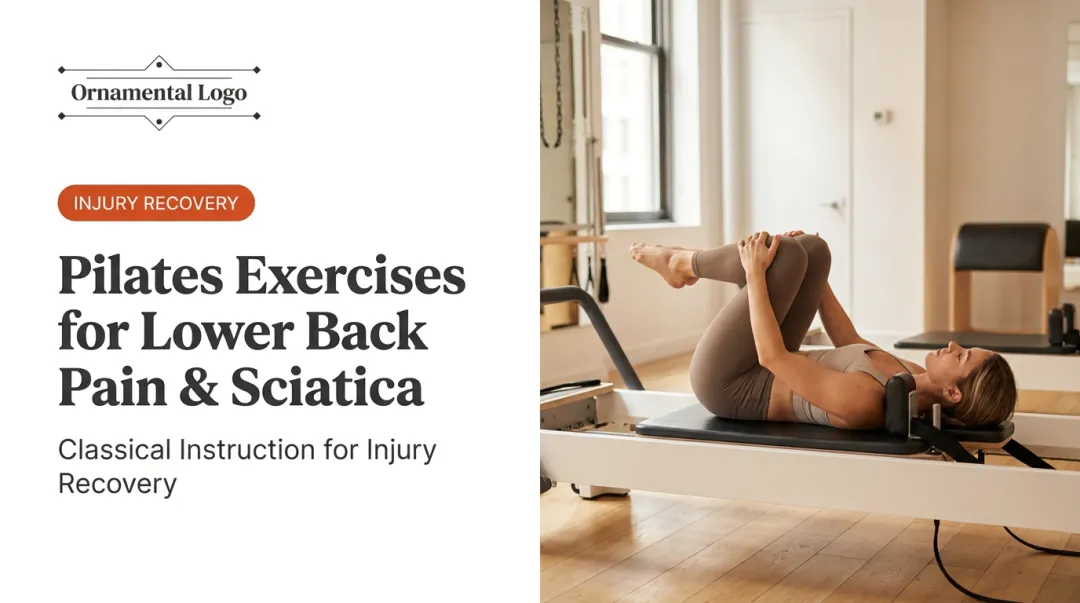
Introduction
Low back pain affects an estimated 619 million people worldwide, making it the leading cause of disability globally, according to the WHO. In the U.S., nearly 4 in 10 adults reported back pain in the previous three months, per CDC data. Those numbers explain why physical therapists and spine specialists point clients toward Reformer Pilates as a non-surgical first step.
What makes the Reformer different from a mat or a gym machine is the spring-resistance system. The adjustable springs support the body in proper alignment during movement, letting you target the deep stabilizing muscles — the transversus abdominis, multifidus, and glutes — without grinding through painful positions.
Unlike most gym equipment, the Reformer can partially unload the spine and dial resistance up or down mid-session, which makes it viable whether you're in an acute flare-up or managing years of chronic stiffness.
This guide covers 11 specific exercises grouped by goal — each with setup cues, the muscle rationale behind it, key modifications for sensitive backs, and practical guidance on practicing safely.
Key Takeaways
- Reformer Pilates targets the core, glutes, and hips — key muscles driving lumbar support
- The 11 exercises below are organized into three categories: core stability, spinal mobility, and hip mobility
- Research supports a 6–12 week program at 2–3 sessions per week for meaningful pain reduction
- Anyone with a diagnosed condition (herniated disc, sciatica, stenosis, osteoporosis) should get physician clearance first
- Private instruction matters — a qualified instructor adjusts resistance and catches compensation patterns before they become problems
Why Reformer Pilates Works for Back Pain
Most back pain traces back to one of three sources: injury, postural degeneration, or lifestyle factors like prolonged sitting and muscle imbalances. Reformer Pilates addresses all three by building the strength that supports the spine rather than just managing symptoms.
The Core Activation Advantage
The Reformer's spring-loaded carriage supports the body in correct alignment, which creates the conditions for deep stabilizing muscles to engage properly. A 2017 RCT published on PubMed compared equipment-based Pilates with mat Pilates over 12 weeks in 98 patients with chronic nonspecific low back pain. Both groups improved, but the equipment-based group showed faster enhancement of transversus abdominis activation — the deep abdominal muscle that acts as a natural brace for the lumbar spine.
A 2023 systematic review confirmed this pattern, concluding that Pilates may help people with chronic low back pain improve core muscle strength and activation around the trunk, pelvis, and abdomen.
Lumbo-Pelvic Control
A key clinical goal in Reformer Pilates is training the hips to move independently from the lumbar spine — a concept called lumbo-pelvic control. When the hips lack mobility or the deep stabilizers are weak, the lower back compensates for every movement, accumulating strain with each step and rotation. Reformer exercises are structured to interrupt that compensation pattern systematically.
Reformer vs. Mat for Back Pain
That progressive approach is also what separates Reformer work from mat Pilates. Mat Pilates requires the body to generate its own stability from the start, which is difficult when pain is present. The Reformer's spring support allows clients to begin at lower resistance and progress as strength improves — a meaningful advantage during early rehabilitation that mat work cannot replicate.
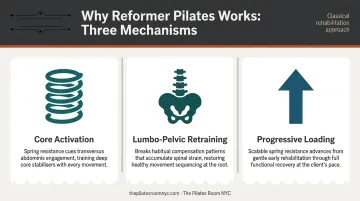
Three mechanisms explain why Reformer Pilates consistently outperforms passive treatment for back pain:
- Core activation: Spring resistance cues the transversus abdominis to engage in positions mat work can't replicate
- Lumbo-pelvic retraining: Structured movement breaks the compensation patterns that accumulate spinal strain over time
- Progressive loading: Clients start light and build — making the Reformer effective from early rehab through full recovery
11 Reformer Pilates Exercises for Back Pain Relief
These exercises are organized into three groups — core stability, spinal mobility, and hip mobility — so the purpose behind each movement is clear and the progression is logical.
Group 1: Core Stability Exercises
Exercise 1: Pelvic Tilt
Lie supine on the carriage with knees bent, feet hip-width on the footbar. On the exhale, gently press the lower back into the carriage by rolling the pelvis into a posterior tilt. Hold briefly, then release. Aim for 8–10 slow repetitions.
This movement engages the transversus abdominis and builds the pelvic-lumbar control that every other exercise in this list depends on. If the pelvis can't stabilize here, no other exercise should come first.
Modification: For acute pain, reduce the tilt to a subtle imprint (barely perceptible movement) and focus entirely on the exhale breath cue before adding any pelvic motion.
Exercise 2: Bridging
From the same supine position, press through both feet on the footbar and lift the hips until you form a straight line from knees to shoulders. Squeeze the glutes at the top, hold 2–3 seconds, then lower with control.
Bridging activates the glutes and hamstrings, which take load off the lumbar discs when they're functioning properly. A 2019 systematic review found that people with low back pain frequently show reduced gluteus medius strength — bridging directly addresses that deficit.
Exercise 3: Knee Folds
Lying supine with the lower back pressed gently into the carriage, lift one foot at a time away from the footbar while maintaining a completely neutral pelvis. The goal is zero pelvic movement — all motion happens at the hip.
The deep abdominals and pelvic floor have to work to keep the lumbar spine still as each leg lifts independently. That's exactly the demand walking places on the back — which is why this exercise transfers so directly to daily life.
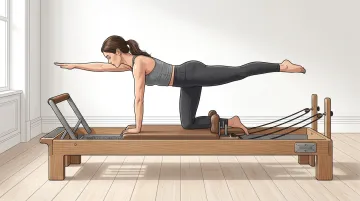
Exercise 4: Arm Reach with Core Activation
Begin in a tabletop quadruped position on the carriage. Extend one arm forward and the opposite leg back simultaneously, drawing the navel gently toward the spine throughout. Alternate sides for 6–8 repetitions each.
Anti-rotation strength — the ability to resist twisting forces — is exactly what this exercise develops. That spinal coordination is what prevents the muscle imbalances behind most recurring back pain.
Group 2: Spinal Mobility Exercises
Exercise 5: Cat-Cow Stretch
Begin on hands and knees on the carriage. On the inhale, let the belly drop and the chest lift (Cow). On the exhale, round the spine upward toward the ceiling (Cat). Move through 5–10 full breath cycles without rushing.
This gently mobilizes each spinal segment in sequence and releases tension along the muscles at the back of the body. It's appropriate even during active stiffness, making it a reliable opener for any back pain session.
Exercise 6: Lower Back Roll Down
Lying supine, articulate the spine off the carriage one vertebra at a time — tailbone first, then lumbar, thoracic, shoulders — then reverse the movement back down with equal control.
This exercises spinal articulation and helps reduce accumulated compression along the vertebrae. Reaching the arms overhead as the spine lowers adds a traction-like sensation that most clients find immediately relieving.
Note: Clients with disc herniations should check with their instructor before attempting full flexion in this exercise.
Exercise 7: Seated Spine Twist
Sit tall on the carriage with legs extended, arms out to the sides at shoulder height. On each exhale, rotate from the waist — not the hips — and return to center. Alternate sides for 6–8 repetitions.
Thoracic and lumbar rotation is frequently restricted in people with chronic back pain. When rotation is blocked in the upper spine, the lower back compensates. This exercise restores balanced rotational movement across the full spine.
Exercise 8: Side Stretch
Lying on your side with the top hand on the footbar, lift the hips to create a lateral line from feet to shoulders. Slowly press the carriage away to create a lateral stretch through the side body, then return with control.
The obliques and quadratus lumborum — muscles running along the lateral trunk — are frequently underdeveloped in people with back pain. Strengthening them directly supports lumbar stability with every rotation and side bend.
Group 3: Hip Mobility Exercises
Exercise 9: Hamstring Stretch
Lie supine with feet in the straps. Straighten both legs toward 90 degrees, pressing the heels gently toward the ceiling while keeping the pelvis neutral. Hold for several breaths, then lower.
Tight hamstrings pull the pelvis into posterior tilt, which increases lumbar strain during most daily movements. Research has confirmed a hamstring-pelvis-lumbar relationship: a 2015 study found that hamstring tightness correlates with restricted pelvic motion and altered trunk mechanics. Addressing hamstring length directly reduces one of the most overlooked contributors to low back pain.

Exercise 10: Leg Circles
Supine with feet in the straps, legs extended. Externally rotate slightly at the hip and trace smooth circles in both directions — 4–6 each way — while keeping the pelvis completely still.
Leg circles mobilize the hip joint and engage the deep hip stabilizers. When the hip can move freely and independently, less compensatory load transfers to the lower back with each step or movement.
Modification: Beginners or those with significant pain should start with a smaller range of motion and increased spring support, progressing the circle size as hip stability improves.
Exercise 11: Child's Pose with Reformer Assistance
Kneel on the carriage and sit back toward your heels. Grasp the footbar and slowly push the carriage away from the footbar, feeling a lengthening stretch through the lower back and hips. Hold for 5–8 breaths, then draw the carriage back in with control.
The gentle pull actively decompresses accumulated spinal compression, making this an ideal cooldown after any demanding session. Clients working through back pain consistently find it one of the most restorative movements in the entire sequence.
Safe Practice Guidelines for Exercising with Back Pain
Not all back pain is the same. Injury-related, degenerative, and lifestyle-related pain each carries different contraindications.
Anyone with a diagnosed condition (herniated disc, sciatica, spinal stenosis, osteoporosis) should get physician clearance and share that diagnosis with their instructor before starting.
The Pain Progression Rule
Use this simple guide during sessions:
- Pain stays neutral or decreases after the first few reps → generally safe to continue
- Pain increases, becomes sharp, or radiates → stop immediately and consult your instructor
Muscle fatigue and next-day soreness are normal. Shooting pain, nerve sensations, or pain that worsens with movement are warning signs — stop and report them to your instructor.
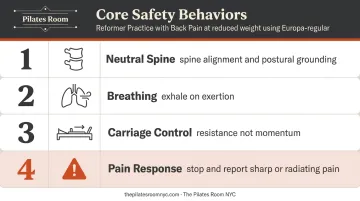
Core Safety Behaviors
Follow these consistently:
- Neutral spine: keep it unless your instructor cues a specific variation
- Breathing: exhale on exertion — never hold your breath during effort
- Carriage control: use resistance, not momentum; jerky movement loads the spine poorly
- Pain response: stop any exercise that creates sharp, radiating, or worsening pain and report it before continuing
How to Build a Consistent Practice — and Why Instructor Guidance Matters
The dosage question most people ask first: how often, and for how long? The equipment-based Pilates research points clearly toward 2–3 sessions per week over a minimum of 6–12 weeks. The 2017 Cruz-Diaz RCT used a 12-week program; the Stieglitz pilot study used 6 weeks. Neither produced meaningful results from a handful of sessions, and neither should set expectations for a quick fix.
A quote commonly attributed to Joseph Pilates holds that you'll feel a difference in 10 sessions, see a difference in 20, and have a new body in 30. Whether or not he said it exactly that way, the underlying principle — that change requires cumulative repetition — is consistent with what the research actually shows.
Why Private Instruction Makes a Difference
For clients managing back pain, one-on-one instruction carries real safety value that group classes can't replicate. A qualified instructor can:
- Watch for compensatory muscle use that loads the spine incorrectly
- Adjust spring resistance to match the individual's current pain level
- Identify movements that may be contraindicated for a specific diagnosis
- Progress the program at a pace that matches actual improvement, not a calendar
This is where The Pilates Room NYC's approach is particularly well-suited for back pain clients. The studio matches instructors to clients based on condition and goals. Enja Schenck (MS Sport Science, CSCS, with training in Postural Restoration principles) and Alison Johnson (26 years of teaching, with anatomy, kinesiology, and injury rehabilitation experience) are two examples of instructors whose backgrounds translate directly to spinal conditions.
For clients with diagnosed conditions, senior instructors provide individualized programming adapted to each stage of recovery — not a generic class sequence.
Manhattan clients dealing with back pain can book a private session at The Pilates Room NYC's Chelsea studio (150 West 28th Street) or call 212-206-1827 to discuss their specific condition with an instructor before committing.
Frequently Asked Questions
Is Reformer Pilates good for back pain?
Yes. Peer-reviewed research supports Reformer and equipment-based Pilates for reducing pain and improving function in chronic low back pain. It strengthens the core and glutes that support the spine, improves lumbo-pelvic control, and can be safely modified for different pain levels and diagnoses. Consistent practice with qualified instruction makes the biggest difference in outcomes.
How often should I do Reformer Pilates for back pain relief?
Most evidence-based programs use 2–3 sessions per week for 6–12 weeks. Many people notice a difference in comfort and movement quality within 4–6 weeks of consistent practice; more significant strength and postural changes typically develop over 8–12 weeks.
Can Reformer Pilates make back pain worse?
It can, if exercises are performed with poor form, at incorrect resistance, or without disclosing a specific diagnosis to the instructor. Working with a qualified instructor (especially in the first several sessions) dramatically reduces that risk and ensures the program is appropriate for your condition.
What types of back pain respond best to Reformer Pilates?
Lifestyle-related and posture-driven back pain tends to respond most completely, and degenerative pain can often be managed effectively with appropriate programming. Conditions like sciatica and herniated discs can also benefit, but typically require physician clearance and modified exercise selection.
Is Reformer Pilates better than physical therapy for back pain?
They serve complementary roles rather than competing ones. Physical therapy addresses acute rehabilitation; Reformer Pilates builds the long-term core strength, flexibility, and body awareness that prevents recurrence. Combining both is often the most effective overall approach.
Do I need prior Pilates experience to start Reformer Pilates for back pain?
No experience is needed. Private sessions are the best starting point for back pain clients. At The Pilates Room NYC, instructors assess your movement patterns and introduce only exercises appropriate for your current condition — so nothing is guesswork from the first session.